Cover photo by 
This post was brought to you in collaboration with our partner site Behind the Score. Discover the Harmony Secrets of Modern Film and Video Games.
“Logical Editor is crafted to handle tasks that are challenging for humans but where computers excel.”
Cubase, as one of the most cherished DAWs for film composers, is admired for its superior MIDI editing capabilities. While the Logical Editor in Cubase is on the lesser-known side, its effectiveness underscores Cubase’s superior MIDI editing capabilities. This powerful tool is specifically designed to streamline complex MIDI editing tasks within Cubase Pro. It operates as a search-and-replace engine for MIDI data, allowing you to execute intricate transformations with precision and efficiency. It’s crafted to handle tasks that are challenging for humans but where computers excel.

For instance, it can effortlessly perform tedious manual tasks, such as incrementing a MIDI value (e.g., velocity) for 100 notes in a second, locating muted events and deleting notes, or even assigning random pitch/velocity/length values to every upbeat note, etc. The sky is the limit when it comes to usage, with your creativity as the driving force.
At first glance, the Logical Editor may seem a bit daunting, appearing as though you need knowledge of a programming language to use it. However, upon closer inspection, all you need is a bit of ‘logical’ thinking for the right purpose, hence the name ‘Logical Editor.’ Numerous resources and examples are available for using the Logical Editor, but here, we’ll explore five examples that we recommend to enhance your Cubase experience.
*Note: This post is written for Cubase 12 users, but the same principles can be applied to lower-version users.
Read Cubase Key Commands to Boost Your MIDI Editing Workflow
Selecting Mute Events
Sometimes, when you’re unsure whether to delete notes, it’s convenient to leave them muted just for peace of mind. Later, when you decide to delete sparsely spread muted notes, the Logical Editor function can be incredibly useful. It allows you to select muted notes effortlessly and once they’re selected, you can simply press the ‘delete’ button to remove them all.

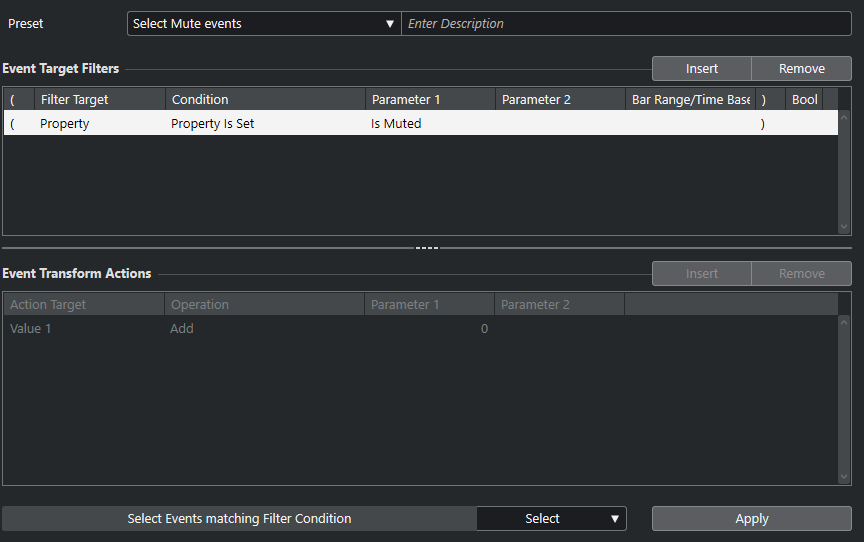
Apply the following settings to use this preset :
- Filter Target: Property
- Condition: Property is Set
- Parameter 1: Is Muted
- Actions to apply: Select
Editing Velocity
Increase/Decrease Velocity by 10
Next up is editing velocity. There are already several ways to edit the velocity of note(s) within the program itself. One method is simply using the mouse to drag the velocity bar up and down. Another option is to enter the desired velocity number into the velocity editor or to click and drag up/down within the velocity editor while notes are selected.

Typically, you can either use the mouse to drag or manually enter a number in the velocity field to adjust the velocity value(s).
Using the Logical Editor, you can customize the velocity of selected notes to any desired value. Below is using the Logical Editor to increase the velocity by +10 for all selected notes. Of course, you should also consider implementing decreasing the velocity by 10 and also assigning both features to key commands for quick access.

Apply the following settings to use this preset
- Filter Target: Type Is
- Condition: Equal
- Parameter 1: Note
- Action Target: Value 2 (=Velocity)
- Operation: Add
- Parameter 1: 10
- Actions to apply: Transform
Manually add values to notes with low velocity
There are endless possibilities when it comes to creating a Logical Editor preset. In our case, we’ve crafted a preset that a) identifies notes with a velocity less than 20 and then b) adds a value of 30 to those notes. This can be beneficial for adjusting the velocity of notes after manually recording with a keyboard, because sometimes a note may not be pressed firmly enough and have a very low velocity.
Apply the following settings to use this preset
- Filter Target: Value 2
- Condition: Less
- Parameter 1: 20
- Action Target: Value 2 (=Velocity)
- Operation: Add
- Parameter 1: 30
- Actions to apply: Transform
Random Velocity
At times, applying random velocities to the notes can yield unexpected fun in your music. This is a relatively straightforward yet frequently desired function. In our case below, we are applying random velocity values ranging from 30 to 82 for the selected notes.

Apply the following settings to use this preset
- Filter Target: Type Is
- Condition: Equal
- Parameter 1: Note
- Action Target: Value 2 (=Velocity)
- Operation: Set Random Values Between
- Parameter 1 (30) & Parameter 2 (82)
- Actions to apply: Transform
Select every 1st (or 2nd) note (downbeat/upbeat)
This last preset is definitely our favorite (and it’s also the one that took the most time to figure out setting up). What the preset does is select every 1st (or 2nd) note from a continuous array of repeating notes.
When you have repeating hi-hat notes and wish to select every upbeat note for velocity adjustments, this preset can come in handy.


Apply the following settings to use this preset
1st-row parameter:
- Filter Target: Type Is
- Condition: Equal
- Parameter 1: Note
2nd-row parameter:
- Filter Target: Last Event
- Condition: Every Other Event
- Parameter 1: Event Counter
- Parameter 2: 2/D-2
Actions to Apply: Select
So when can we make use of this? A great use case is when you have repeating rhythmic notes (e.g., hi-hat notes) and wish to select every upbeat note to make edits. For instance, if you’d like to lower the velocity of every 2nd note in a repeating hi-hat pattern, you would simply apply this preset and then use one of the velocity-related presets we’ve discussed so far in this post.
Wrapping Up
That pretty much wraps everything up. We’ve explored just a handful of presets, providing perhaps a glimpse into the vast capabilities of Cubase’s Logical Editor. We hope our article has offered a solid and helpful introduction.
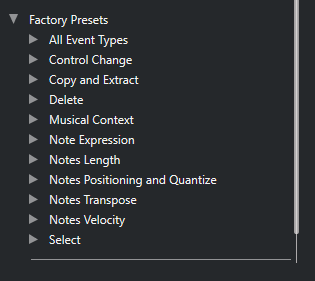
In addition to the presets covered, Steinberg offers a range of pre-made factory presets that can truly transform your workflow. Take the time to explore them.
We understand that this article might sound a bit technical at times. But, we want you to remember what we wrote at the beginning of the article. For composers working with DAW, we believe there’s nothing more frustrating than software getting in the way of inspiration. The Logical Editor can play the role of a helpful companion in so many situations, allowing you to swiftly edit and bring your musical ideas to life without any hassle.

This post was brought to you in collaboration with our partner site Behind the Score. Discover the Harmony Secrets of Modern Film and Video Games.